A breath of fresh data
I’m not fun at parties. At least not the ones involving firepits and BBQs. Simply said, smoke gives me headaches and nausea. Sadly for me, my neighbours like them and in winter some houses rely on fireplaces and heating stoves.
Although my house is very well insulated, it comes with an uninterrupted ventilation system (heat exchange). This system is just a bit dumb, and doesn’t sense anything other than CO2 and humidity levels. If CO2/RH is high, the system will speed up. With an unfortunate wind bearing, a lot of smoke will be sucked into the system and spread throughout the house, making for a stinky, unhealthy mess. Thankfully, you can take the power off, which I would do manually - whenever I smelled something off. Sadly, you’re already too late, and you still find your house stinky when you’re out of the house.
Solutions
I’ve been wanting to integrate a Raspberry Pi with Enviro+ in my network for some time. After the umpteenth time dealing with a smokey situation, I decided to do some research. It turns out the Enviro+ board isn’t supported very well anymore, and requires a lot of additional accessories to provide useful information. I also wanted to mount it as close as possible to my air vent, so I’d need a stable solar solution.
Long story short, this wasn’t a viable option. It’d cost a small fortune (relatively speaking) and would take a lot of time to setup.
Luckily, I ran into the Seeed Studio Grove SEN5X all-in-one air quality sensor, based on the Sensiron SEN55, After some more research, I found out they pair up with ‘almost plug-and-play’ ESP32 microcontrollers.
They don’t lie when they say it’s a thumb-sized microcontroller. It’s an incredible feat of technology!
Assembly
Because the Seeed Studio sensor is paired with a Grove connector, the assembly is very simple. Parts I used:
- Grove SEN5X all-in-one air quality sensor
- XIAO ESP32-S3 or ESP32-C3/C6 (with headers)
- Grove Shield for XIAO
- Home Assistant (any)
- A stable Wi-Fi connection at mounting location
I chose to buy pre-soldered boards, because it’s a lot easier. The last time I soldered something was 20+ years ago.
There’s also the Adafruit QT PY ESP32, with IIC grove connector. Because you don’t need to add a shield, you can opt for a headerless version. Depending on your needs, this may be a better option.
There’s little difference in the C3 and S3 in this regard. Older posts often refer to the C3; Besides providing better wireless connectivity and capacitive touch sensing, the S3 is also more energy efficient. There may be a slight price difference (± €3).
ESPHome
To communicate with HomeAssistant, your ESP32 microcontroller needs to be flashed with ESPHome firmware. This may sound daunting, but it’s a very simple process. You don’t require any special equipment.
To flash and configure your device, you require the ESPHome Device Builder. If you’re using HomeAssistant OS, you can simply install the ESPHome add-on. If you’re using Docker, you need to set up an extra container.
To install the ESPHome Add-on: Install ESPHome Device Builder
Add-on source: GitHub.com
Docker container
services:
  esphome:
    image: ghcr.io/esphome/esphome
    container_name: esphome-device-builder
    restart: unless-stopped
    environement:
      - ESPHOME_DASHBOARD_USE_PING: true
    # network_mode: host
    networks:
      macvlan1:
        ipv4_address: ${ESPHOME_IPV4}
    volumes:
      - ./config/esphome:/config
Depending on your setup, either use host or macvlan networking.
Once installed, ESPHome can be found at <host>:6052.
Installing ESPHome firmware on your ESP32
The listed ESP32 controllers come with a USB-C connector, making it very easy to connect and provide power. Simply connect the device to ANY computer with internet access (in your network) and open the web installer in a Chromium browser (Edge, Brave, Chrome).
Enter your Wi-Fi credentials and follow the instructions on the screen. In my case the Wi-Fi credentials didn’t get synced correctly, so I had to configure them again afterward.
Now your device should be available in your network. You can go ahead and configure it to your liking using ESPHome Device Builder; <host>:6052.
Some guides state you need to configure an API key. This has been overhauled in recent updates. Simply adding api: (default) is enough for the device to talk to HA.
Source: Native API Component
Connecting to Home Assistant
If everything’s right, your device should already be discovered by HA. In HomeAssistant, navigate to Devices & Integrations and add “ESPHome”. Then Configure the new device and check “Allow the device to perform Home Assistant Actions”.
Or click here: Add ESPHome integration
Grove
Now we can go ahead and install our Grove sensor. This particular sensor requires an I2C (IIC) bus. Luckily, this is provided by the Grove shield. There are two I2C connectors, as you can see on the pinout diagram.
You need to note the corresponding GPIO headers depending on your ESP32 controller. In the case of the ESP32-S3, these are:
- SDA: GPIO #5
- SCL: GPIO #6
Source: Hardware overview
About I2C: Inter-Integrated Circuit Protocol
If you install two I2C Grove connectors, they will both work through these pins, as devices use different addresses.
Now we can expand the configuration of our controller using ESPHome Device Builder:
# base configuration here
wifi:
ssid: !secret wifi_ssid
password: !secret wifi_password
# APPEND THESE VALUES
i2c:
sda: 5
scl: 6
id: bus_a
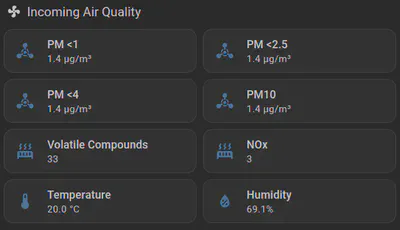
# Particulate Matter (PM) µm Weight concentration
sensor:
- platform: sen5x
i2c_id: bus_a
id: sen55
pm_1_0:
name: "PM <1"
id: pm_1_0
accuracy_decimals: 1
pm_2_5:
name: "PM <2.5"
id: pm_2_5
accuracy_decimals: 1
pm_4_0:
name: "PM <4"
id: pm_4_0
accuracy_decimals: 1
pm_10_0:
name: "PM <10"
id: pm_10_0
accuracy_decimals: 1
temperature:
name: "Temperature"
accuracy_decimals: 1
humidity:
name: "Humidity"
accuracy_decimals: 1
voc:
name: "VOC"
algorithm_tuning:
index_offset: 100
learning_time_offset_hours: 12
learning_time_gain_hours: 12
gating_max_duration_minutes: 180
std_initial: 50
gain_factor: 230
nox:
name: "NOx"
temperature_compensation:
offset: 0
normalized_offset_slope: 0
time_constant: 0
acceleration_mode: low
store_baseline: true
address: 0x69
update_interval: 10s
Source: ESPHome example configruation
I cut down the sensor names, because they get synced with HA as their respective IDs. Make notice of the I2C configuration at the top. Although nothing will explode, the device just won’t work correctly if the headers aren’t properly configured.
Now you can power off your device and assemble.
Mounting & Conclusion
I went ahead and installed the sensor outside, in proximity to the house, whilst keeping the chips indoors. I used a 50cm grove connector, and tucked an extra one behind for future expansion. I stuck it on the underside of a light fixture with some mounting tape.
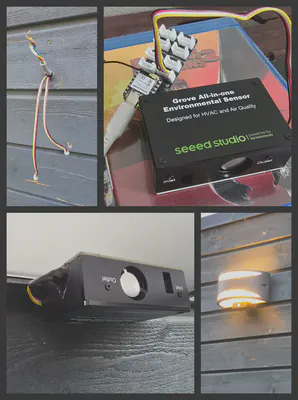
I’m not sure how the outdoors will affect the longevity of the device, but I made sure it’s in a dry and well-ventilated area. I also applied a tiny bit of duct tape to the connector.
These sensors make good companions for indoor air quality control. Do note that the tiny fan emits some noise (~24Db). I wouldn’t mount it close to my bed.
All that’s left to do is configuring triggers to shut down my ventilation when the air is polluted. I’ve done some small tests and found it responds very quickly.
Updates
July 15
Last night I suddenly started smelling smoke indoors. A quick look (sniff) outside confirmed I wasn’t crazy. The sensor doesn’t pick up pollution in higher air layers, but it does creep into the vents. I unplugged the system today and mounted it directly into my ventilation unit, after the coarse filters. I have a special PM filter as a last line of defense. My thinking is I can detect pollution in-between the filters, locking it inside the ventilation unit.
It turns out my ventilation unit is more hackable than I thought. The pressure releases in the side allow just enough room for a ribbon cable. I assume adding the matchbox-sized sensor doesn’t obstruct air flow that much. Because the air is already being filtered, I’ve greatly lowered the thresholds in my automation, triggering at 30 µg/m3 for PM 1 - 2.5, hoping that’ll catch it in time. I still have to set up a timeout sequence, so it doesn’t get stuck in a power cycle loop. I have some doubts whether smell is in fact detectable with PM levels. To be continued.
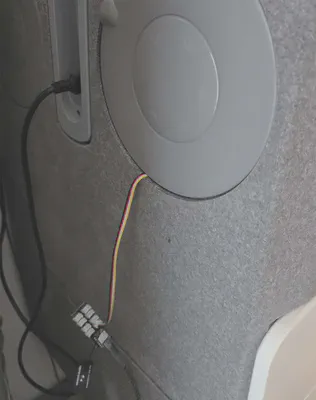
It actually makes sense to mount it inside the unit, as the product does state “Designed for HVAC and Air Quality”.
August
I’m still not sure how to combat the scent of smoke indoors. It seems that although the particulate matter levels are normal, scent is delivered through a different medium, or perhaps a much smaller scale. I also found that the PM levels vary greatly depending on relative humidity. This causes unwanted ventilation shutdowns. I’ve therefore disabled the automations until I figure out how to properly monitor environmental values.
Dangers of particulate matter
Moderate PM Levels (0-35 µg/m3):
PM levels within this range are considered relatively safe for most individuals. However, sensitive groups, such as the elderly, children, and people with respiratory or cardiovascular diseases, may experience minor health effects if exposed for a prolonged period.Unhealthy for Sensitive Groups (35-55 µg/m3):
At these levels, sensitive individuals may experience increased respiratory symptoms, such as coughing, wheezing, and shortness of breath. It is advised for vulnerable individuals to reduce outdoor activities and take precautions to limit exposure.Unhealthy (55-150 µg/m3):
When PM levels reach this range, even healthy individuals may experience adverse health effects. Symptoms can include aggravated respiratory conditions, reduced lung function, and increased risk of respiratory infections. It is recommended to minimize outdoor exposure, especially during strenuous activities.Very Unhealthy (150-250 µg/m3):
PM levels in this range pose a significant risk to everyone. Even short-term exposure can lead to severe respiratory problems, exacerbation of existing conditions, and increased hospital admissions. It is crucial to stay indoors and keep windows closed, using air purifiers if available.Hazardous (>250 µg/m3):
PM levels exceeding this threshold are extremely dangerous and can cause immediate and severe health effects. People of all ages and health conditions are at risk, with symptoms ranging from respiratory distress to cardiovascular complications. It is crucial to stay indoors, ideally in buildings with efficient air filtration systems.
Sources:
- https://ww2.arb.ca.gov/resources/inhalable-particulate-matter-and-health
- https://www.lung.org/clean-air/outdoors/what-makes-air-unhealthy/particle-pollution
- https://hellowynd.com/blogs/post/understanding-pm-levels-what-is-considered-unhealthy-and-why
Fire & Smoke
I can’t wrap my head around it… There’s simply no need for fireplaces in a highly developed society, let alone bonfires. Some even say they “love the smell”. Wood smoke is packed with toxins and carcinogenics. Please read about the dangers of wood smoke:
or simply do a web search for “dangers of wood smoke”
Considering a lot of people also burn treated/painted wood, the impact on the environment and health is enormous.